Wednesday, July 31, 2013

Fair Play


Hi!  If you enjoy this blog, please become
a follower, I need to know if anyone is out
there using these tutorials!  And pop on over
to the American Homestead blog and see what
is going on in my life.  All the best!  ~ Ellen
 
 
We are quilting along with Barbara Brackman's
Block of the Week, Grandmother's Choice.
 
 
This is how I made my block, it may differ
from the original.
 
 
Fabric Requirements:

Fabric A: Blue
2 - 4 1/2'' squares
Fabric B: Red
2 - 4 1/2'' squares
Fabric C & D:
scraps large enough for circle units
Wonder Under

Update:  Das Quiltmonster from Germany just
asked what is Wonder Under.  It is a paper backed
fusible web product.  Thanks Regina!
On the paper side of the Wonder Under
draw a 6'' square and then draw lines to
divide it in quarters.
 
 
Using a compass, draw a 6'' square,
then mark 1'' in from drawn circle
and draw another circle.
 
Layout 4 1/2'' squares as shown and sew
together in 2 rows.
 
Sew rows together and press final seam
open to reduce bulk.
 
 
Cut circle shapes as shown, leaving
some excess paper along curved parts.
Following manufacturer's directions,
adhere to the wrong side of Fabric C & D
scraps.  Cut out as shown above.
 
 
Adhere to 4-patch unit.
 
 
Finish edges as desired.  I used a
hand embroidered blanket stitch.
Square to 8 1/2''.
 
Check out everyone's work on Dustin's Flickr site:
 
 
American Homestead is
now on Facebook.  Please
"like" my page.
 

Wednesday, July 24, 2013

Heroine's Choice

And A Feltwork Tutorial
 
 
We are following along with Barbara Brackman's
Block of the Week, Grandmother's Choice.


I like to use felt for applique.  I design
feltwork patterns ~
 
 
and thought this would be a good chance to try
a design that was 8 1/2''.
 
 
So here is a little free feltwork tutorial
for this week!
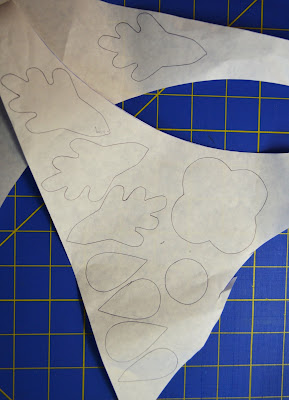
I start by determining the size I would
like the piece to be and marking that
measure along the fold of a folded piece
of construction paper.  I then sketch the
design and cut it out and when you open

the folded paper...


... you have your designs.  I used a circle
template for the 1 1/4'' circle and for the
flower shape, this pattern was just slightly
larger than a piece from my
 
 
Serendipity pattern so I made it larger.
 
 
It is a good idea to lay it all out prior
to cutting your pieces to be sure it all
fits well.
 
 
Here are my pattern pieces, just enlarge
the white area until it measures 8 1/2''
across.  At this point I transfer the designs
to poster board and cut them out since this
makes tracing more stable but if you are
only making one, you could trace the
construction paper shapes if you are careful.
 
 
Trace onto the dull side of freezer paper.
( If I have scraps left over from bigger
projects I save them and use them for
small pieces like this project.)
 
 
Press the shapes onto good quality felt.
I use a 20% wool/80% rayon felt from
National Nonwovens that is excellent
quality and the colors are fabulous.
This is nothing like the 5/$1 craft felt.
 
 
Cut out the pieces and pin to your 8 1/2''
background piece. 
 
 
I whip stitched all the pieces in place using
a matching embroidery floss.  I then added
some additional stitching to the center using
very simple embroidery stitches such as, the
French Knot and the Lazy Daisy stitch.
 
 
Hi!  If you enjoy this blog, please become
a follower, I need to know if anyone is out
there using these tutorials!  And pop on over
to the American Homestead blog and see what
is going on in my life.  All the best!  ~ Ellen
 
 
I'll be hanging this piece somewhere in
my house.  I hope you will give felt applique
a chance, it is fast, easy & fun.
 
Checkout everyone's work on Dustin's Flickr site:
 
American Homestead
is now on Facebook.
Please "like" my page!
 

Wednesday, July 17, 2013

Barrister's Block


Hi!  If you enjoy this blog, please become
a follower, I need to know if anyone is out
there using these tutorials!  And pop on over
to the American Homestead blog and see what
is going on in my life.  All the best!  ~ Ellen
 
 
We are quilting along with Barbara Brackman's
Block of the Week, Grandmother's Choice.


This is how I made my block, it may
differ from the original.
 
 
Fabric Requirements:
 
Fabric A: White
1 - 2 1/2'' square
3 - 3 1/4'' squares - Mark
a diagonal line on the back.
 
Fabric B: Red
3 - 3 1/4'' squares
 
Fabric C: Floral
1 - 7 1/4'' square
 
Fabric D: Blue
1 - 7 1/4'' square - Mark
a diagonal line on back.
 
 
Make Small Half Square Triangles:
 
Pair Fabric A and Fabric B 3 1/4''
squares with right sides together.
Sew 1/4'' away from each side of
drawn line, cut on drawn line and
press seam to the Fabric B.  Square
to 2 1/2''.  You will have 6 Half
Square Triangles.
 
 
Make Large Half Square Triangles:
 
Pair the Fabric C and Fabric D 7 1/4''
squares and make half square triangles
as shown above.  Square these to 6 1/2''.
You will end up with 2 but only need 1,
keep the other for another project.
 
 
Make Side Unit:
Layout 3 Half Square Triangles as shown
and sew together.  Press seams to the bottom.
 
 
Layout side unit and large Half Square
Triangle as shown.  Sew together taking
care to sew a thread width to the right of
the intersections of the seams as shown
by the arrows.
 
 
By taking care in sewing the above seam,
your points will be perfect as shown above.
 
 
Make Top Unit:
Layout small Half Square Triangles
and the Fabric A 2 1/2'' square as shown
and sew together.  Press the 2 left seams
to the left and the far right seam to the right.
 
 
Place units together as shown and sew
together taking care again to sew a thread
width above the intersections of the seams
as shown by the arrows.   Press seam to the
top. 
 
 
Square to 8 1/2''.
 
Check out everyone's work on Dustin's Flickr site:
 
American Homestead is
now on Facebook, please
"like" my page!
 
American Homestead now has
a youtube channel with videos
of things we find interesting
from around the world.  More
to come, please subscribe.

Wednesday, July 10, 2013

Aunt Mary's Favorite


Hi!  If you enjoy this blog, please become
a follower, I need to know if anyone is out
there using these tutorials!  And pop on over
to the American Homestead blog and see what
is going on in my life.  All the best!  ~ Ellen
 
 
We are quilting along with Barbara Brackman's
Block of the Week, Grandmother's Choice.


This is how I made my block.  It may
differ from the original instructions.
 
 
Fabric Requirements:
 
Fabric A: Fussy Cut
1 - 4 1/2'' square
 
Fabric B: Blue
4 - 2 1/2'' squares - Mark
a diagonal line on back.
 
Fabric C: White Print
4 - 2 1/2'' squares
 
Fabric D:  Red
3 - 2 1/2'' x 4 1/2'' rectangles
 
 
Make Center Unit:
Place a Fabric B square on opposite
sides of Fabric A square as shown and
sew on drawn line.  Press to the corner,
then trim seam to 1/4''.
 
 
Repeat to opposite corners and square
to 4 1/2''.
 
 
Sew a Fabric D rectangle to each side of
center unit and press seams to the Fabric D.


Sew a Fabric C square to each side of
a Fabric D rectangle as shown.  Make 2.


Sew long rectangle units to top and
bottom of center unit as shown.
Square to 8 1/2''.
 
Check out everyone's work on Dustin's Flickr site:
 
 
American Homestead is
now on Facebook.  Please
"like" my page.
 
 
Subscribe to American Homestead's youtube channel:
 

Wednesday, July 3, 2013

Star of Hope


Hi!  If you enjoy this blog, please become
a follower, I need to know if anyone is out
there using these tutorials!  And pop on over
to the American Homestead blog and see what
is going on in my life.  All the best!  ~ Ellen
 
 
We are quilting along with Barbara Brackman's
Block of the Week, Grandmother's Choice.
 
 
This is how I made my block, it
may differ from the original.
 
Fabric Requirements:
 
Fabric A: Red
4 - 3  3/16'' squares
 
Fabric B: White print
2 - 4 1/4'' squares - Mark a
diagonal line on back.
 
Fabric C:  Blue
1 - 4 1/4'' square
 
Fabric D: Green
1 - 4 1/4'' square
 
Fabric E: Fussy Cut
1 - 3  3/16'' square
 
 
Make Half Square Triangles:
 
Pair 4 1/4'' squares with right sides
together in the following combinations:
 
1 - B/C     1 - B/D
 
Sew 1/4'' away from each side of drawn
line, cut on drawn line.  Press seam to
the darker fabric.  Use for Quarter Square
Triangles.
 
 
Make Quarter Square Triangles:
 
Mark a diagonal line on the back of the
B/D Half Square Triangle unit going from
the opposite corners from the seam.
 
Place a B/C and B/D Half Square Triangle
together with right sides together.  When you
pull back the corner along the seam it should
look like the photo above.  Sew 1/4'' away from
each side of the new drawn line, cut on drawn
line and press seam open to reduce bulk.
 
 
Now we must square this unit to 3  3/16''.
(To halve 3  3/16'' would just be going too
small so we are using a generous 1 9/16'')
This is a bit tricky since we now will have to
deal with small measurements.  I have marked
my ruler with tape to show the intersection of
the 1 9/16'' lines .  Place the point where these
2 lines intersect on the middle of the Quarter
Square Triangle (where all the fabrics meet in
 the middle). Make sure the diagonal line of the
 ruler is on the diagonal seam line. 
 Trim the top and right side. 

 
Now rotate the block so the untrimmed
edges are on the top and right sides.
Square up the block to 3  3/16.
Make 4 of these units.

 
Layout units as shown and sew together
in 3 rows.  Press seams in rows 1 & 3 to
the outside and seams in row 2 to the inside.
 
 
Sew rows together and press the final seams
open to reduce bulk.  Square to 8 1/2''.
 
Check out everyone's work on Dustin's Flickr site:
 
 
American Homestead is now
on Facebook.  Please "like"
my page.